Tuesday, August 30, 2011

Family Treasures

After my Grandfather passed away a while ago, the aunts, uncles and Grandmother did some housecleaning, and I made sure I would not miss the event. I always want to see what goes into the 'junk' box, and did I have fun rummaging through it...
old cards...
A 1968 Rand McNally road atlas. I have searched google a few times, and can not find any book like it online. I am not sure why that is. I will just pretend that means they are rare, and it is extremely valuable... :)
 
The best find, two old plates. One is ceramic, the other enamelware. Both are cracked.

An old yeast container; I remember my mother using yeast from tins like these. It was not instant yeast, but the kind that had to soak a while before you could use it.

This reader is one my mom picked out for me. She knows I like old stuff...thanks Mom. Jessica loves reading it. Does anyone of my relative readers know, (and is brave enough to comment ;) was this Grandfather's reader when he went to school? I would love to know!
It is a canadian reader filled with lots of good old-fashioned stories and pictures.
An old book that has lovingly received a fabric cover.

And oh, the old letters and envelopes and books that any vintage collector can use!

This one is amazing. I got several short papers, school papers I believe, with the most beautiful hand writing I have ever seen. They must have really focused on neatness back then. Isn't that written with a fountain pen?
This must be how they learned. I also found this penmanship notebook. Not only were the students learning penmanship, but at the same time facts as they copied the sentences over and over...
The book has some blank pages in the end. Maybe I should get out a pen, and try my hand at it; see if I am better now than when I was in school...I was terrible.

...what's important is the memories of my Grandfather that I took with me out of that box...

Saturday, August 27, 2011

Where's the whipping???

  Tonight, we had a lovely supper. Or dinner, dependin on where you live. I cooked some chicken noodle soup, and had made some chocolate pudding pie for dessert. It was a wonderful rainy Saturday night, so I do what we sometimes do in the situation. Turn off the light overhead, light an oil lamp, and a few pretty candles in this case, and simply enjoy the sweet and simple things in life. Quietly we finished our soup while talking about the day, all the while listening to the thunderstorm and rain outside.
When I dished out the pie, Jessica asks, "Mommy, where's the whipping?" We cracked up laughing. Earlier, she had made the whipped topping. No, she did not get a whipping, but she did get a good serving of topping.
Life is sweet!


Thursday, August 25, 2011

Tea party with my daughter

Now for the tea party details I promised you... The chalkboard is an old one that I recently painted white. It used to be just plain wood.
One reason I wanted the tea party at this time was because the tree the table was under, was blooming beautiful purple flowers. Which is why we chose a purple theme for the party.

Jessica baked these mini cupcakes a day before. I try to stay away from artificial food coloring. So we iced them with icing made with juice extracted from huckleberries. We couldn't have gotten a prettier coloring anyway!
Wonderful black tea spiced with blueberry and vanilla that I bought just for the ocassion. I must say, I love Dilmah teas! They come with different flavors like lemon and strawberry etc...

Some flower scented purple incense cones.
The lantern is one I recently painted white. Can you tell I am starting to like white things? I have some more items that need painting white, but for now I am happy doing other 'stuff' that is fun. (Think old wooden egg crates)
Can you guess where I got the idea for a white lantern? Why, Aunt Ruthie's, of course! I saw one on her blog, and liked the idea so much, now I have this one inside my home as decoration. People all love it! Even my husband, who was very skeptical when I said that I would paint a red lantern white! Don't you just love when that happens!?

My daughter loves the Little House books, and never tires of reading them over and over. That is fine with me! I couldn't think of better books for her to enjoy...I used this one because it matched with the color theme, AND because I really believe these are the happy golden years...

Isn't it amazing how the colors match?

What was very cute was the way the boys came around to grab their cupcakes. Joseph is holding a stick  in his hand, while behind Timothy is the stick horse and straw hat he has thrown down to take a bite. I love my boys and their boyish ways!
...and my girl for her girlish ways...

This white dress was given to her by her auntie Delia who wouldn't just give it to anyone because it was so special to her. Thank you sister!
The hat--under $2 US at the local store...
I deeply treasure these special moments with my one and only daughter (so far). I am so thankful the Lord saw fit to bless me with her!

Linked to these parties:
The Shabby Nest 
Funky Junk Interiors

Friday, August 19, 2011

My Western Wallhanging


Howdy!

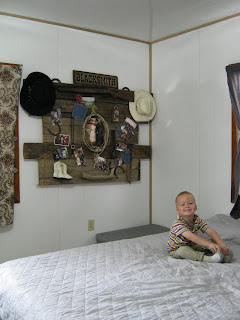
For a long time I have dreamed of having a house with one bare wood wall that I was going to decorate with our western and cowboy memorabilia. Well, who knows how long I would have to keep dreaming so I decided this is what I'll do. Make a wallhanging which can be moved wherever we move... I had started collecting different items from here and there while cleaning house lately, and when FJI said her next theme would be western/farm, that was all the push I needed to finally start my project. I got busy last week, and here is the result.
 I started with raiding hubby's parents' farm for old wood. I found enough old stuff to make the perfect background. When I fell in love with Daniel, he was a cowboy on that farm. That is my first impression of him, so in my eyes, he is still my cowboy, even though he is more engineer now than cowboy. We used to do a lot of riding and cowboying way before any children came into the big picture. It felt good to put together all the cowboy items from years past, and Daniel was quite pleased and surprised when I revealed the finished project to him. I kept it somewhat secretive from him. When he saw it, he understood what all that old wood was for! And now he likes old wood too... :)

 When I started out, I did not have the whole picture in my mind, but I realized as I was arranging the pieces on the boards, I soon got an idea for what 'goes'. 
I wasn't sure which photo to put in the middle, so I tried with two different ones... We did not have a western wedding; only took western style photos before the wedding. I am always glad we did. Those are our wedding hats.

 I just had to throw in this little piece with the cute saying.
 Photos of our children.

The horseshoes used are ones that used to be on Rose, our special horse in the US. (Oh and I realized I made that horse story part 1 and have yet to post part 2!)
 These cutest little cowgirl boots where my daughter's when she was 2. So cute, I can't part with them!

 ...more wedding memories....

 cousins
 This piece of wood is a dried cactus that comes all the way from Arizona. I thought it fit in so well, especially since we both love the American West.
 
 A hilarious card Daniel's brother gave us when we were married a little while... ;) Timothy thought it was him...

 Photos of Daniel's bygone cowboy bachelor days...the pockets come from his used wranglers. He has worn through many a pair.

 His old belt buckle...

The gun is just an air rifle.
The wallhanging hangs in our bedroom. Here in Belize the houses usually have lots of window space, so it is hard to fit anything big into the bare wall space.

So long, cowgirls!
Linking to parties:
Funky Junk Interiors
The Shabby Nest

Wednesday, August 17, 2011

Let's make Tamalitos

This week Monday I had to make tamalitos. I say had to because when that corn is ready to use, I only have about a 2 or 3 day gap where I can do it.

Here in Belize it is illegal to raise genetically modified corn, so I don't need to worry about developing allergies or other health problems from field corn. Yoohoo!

The corn hair is almost dried off, but best if still a little soft close to the ear. The kernels should squirt juice if pinched with a fingernail. If they don't, the corn is overripe. I did not have to get it from the field, but the boys who did it for me, chopped off the bottom part of the ear. This makes for easy peeling.
I had my sister-in-law over for this time. It is always much more fun if you do big chores like these with someone as nice as her...:) Plus it gave the young cousins a good chance to play together.


 For me, the best thing to do before the corn arrives from the field is to prepare everything. Lay everything out that you will need. Salt, sugar, butter, chicken powder, onion, or whatever else you feel like adding.
 Get your blender out. Or your mother-in-law's, if you don't have your own.
 Put the canner or other huge pot on the stove on low heat to steam the husks in, and fill with about a third full of water. Now, when the corn comes, you are ready to roll!
 Everyone can pitch in with peeling it...
 Save the nicest husks for later. You want to save about two of the prettiest and biggest husks layers, but not the hard outside ones. Somewhere in the middle are a few that will be perfect. You'll see.
You want to peel the corn carefully, because we will be using the husks to wrap the corn in later on...

You want to steam the husks for several minutes until they are more pliable. Set aside.

 In a cookie pan, I put a cutting board, and with a sharp knife slice the kernels off the cob. Just one slice should do it; if you go too deep, you will get too much starch, and the tamalitos end up being too dry.
 Once you have a blender full, add a little moisture like water or milk, and blend away! The mixture will be somewhat runny, but that's ok. The starch should thicken it up. Pour into a big bowl and put in freezer or refrigerator until you have all corn blended. With one batch you may add some onion if you prefer, but this is optional. I had pre-made some ground chicken, so I added that to the batter. This does not have to be done but if you prefer it to be a whole meal, then adding some meat is a good idea.

I am really bad when it comes to exact measurements. God had given us the ability to taste, and I always rely on that when it comes to making tamalitos. I will include a basic recipe though to make it easier for you.

Add some melted butter (or margarine), salt and just a little bit of sugar to taste. Add chicken powder too, or do without. This is optional as well. Keep tasting to see when you have gotten it to taste 'right' for you.

Here I had forgotten all about taking photos, so let's see if I can just explain it. Once you have all ingredients mixed, take two husks, and put one on top of the other as in the below photo of a done tamalito.

 Add a serving spoon of the batter, and wrap the sides over it, and then fold the tips of husks inward. Place upside down so it won't open. Don't worry if it will drip a little. It should keep enough moisture.

In the pot or canner, have a rack in the bottom where you stack your tamalitos. Pour some water on, and cover with lid. Cook for one hour. Remove and cool, or eat while hot.
You can freeze these and they will remain good for several weeks. Heat up the same way you cook them, but just till they are heated through.

If anything is not clear but you want to try making these, feel very free to ask more questions.  

 Basic Recipe

one blender full of field corn
2 teaspoons salt
2 teaspoons chicken powder (consomme)
1 tablespoon sugar
1/2 stick butter or margarine
1/4 onion
1/2 - 1 cup of milk or water, (depending on how ripe the corn is)

You might prefer it saltier, so be sure to test taste it to see when the flavor suits you. Or you might prefer more sugar, or no sugar at all. Or more consomme and less salt. I think you get the idea! Go with what works for you.


Related Posts Plugin for WordPress, Blogger...