Showing posts with label Recipes. Show all posts

Saturday, December 10, 2011

Hot Orange (Cider?)

It is getting chilly in Belize. And then I am reminded that a cup of hot apple cider would be great. Well, I could do that, but it would cost a pretty penny, so I decided to make do with orange juice. Those we get at 10 cents a piece whereas a big apple is 2 dollars. No can do apples! I found out I liked the mulled orange juice just swell, although my little Canadian/Americans would have preferred apple cider.

Take: one quart orange juice
Add: 3 cinnamon sticks
some whole cloves, about 6 pieces or to taste
some orange peel
a tablespoon or two of brown sugar, as the juice tends to sour a little from heating

Bring to a boil, simmer on low for about 10 minutes, turn off and let sit for a bit to mix flavors. Serve warm in some pretty tea cups!


This time I am linking up to these parties:
 Artful Affirmations
Sweetology

Thursday, November 24, 2011

Turkey Nuggets recipe


I like to bake a big turkey for Thanksgiving, because I sure don't mind the leftovers. Here is the way our family prefers to use up leftover turkey. It works well for chicken too. This is one way I can cook turkey for a second meal but it does not taste so obviously leftover. People usually agree when I serve them this meal. When I made these nuggets the night after our dinner, my husband looked at the bowl full and said, "This looks like it will taste better than it did yesterday." As much as I like turkey dinners, I might have to agree with him on this one.

When I have leftover cranberry, I like to make that into a sweet and sour dipping sauce.This time I did not, so I just made my regular sweet and sour sauce which is really good too.

Turkey Nuggets Batter:

1 cup flour
2 tsp salt
1 tsp baking powder
1 egg
2/3 cup milk


Mix together thoroughly, and dip turkey pieces in it. (Pieces should be about 1 inch wide). Deep fry on both sides till golden brown, then place on paper towel. Serve with the following sauce.

Sweet and Sour Sauce:

1/2 cup ketchup (or cranberry sauce)
1/4 cup vinegar
2/3 cup sugar
3/4 cup water
1 tsp corn starch
pinch of salt

Bring ingredients to a boil to thicken. Serve with the turkey or chicken nuggets.

And please let me know what you think!

Linking to:
This Chick Cooks
The Shabby Nest 
Funky Junk Interiors

Wednesday, August 17, 2011

Let's make Tamalitos

This week Monday I had to make tamalitos. I say had to because when that corn is ready to use, I only have about a 2 or 3 day gap where I can do it.

Here in Belize it is illegal to raise genetically modified corn, so I don't need to worry about developing allergies or other health problems from field corn. Yoohoo!

The corn hair is almost dried off, but best if still a little soft close to the ear. The kernels should squirt juice if pinched with a fingernail. If they don't, the corn is overripe. I did not have to get it from the field, but the boys who did it for me, chopped off the bottom part of the ear. This makes for easy peeling.
I had my sister-in-law over for this time. It is always much more fun if you do big chores like these with someone as nice as her...:) Plus it gave the young cousins a good chance to play together.


 For me, the best thing to do before the corn arrives from the field is to prepare everything. Lay everything out that you will need. Salt, sugar, butter, chicken powder, onion, or whatever else you feel like adding.
 Get your blender out. Or your mother-in-law's, if you don't have your own.
 Put the canner or other huge pot on the stove on low heat to steam the husks in, and fill with about a third full of water. Now, when the corn comes, you are ready to roll!
 Everyone can pitch in with peeling it...
 Save the nicest husks for later. You want to save about two of the prettiest and biggest husks layers, but not the hard outside ones. Somewhere in the middle are a few that will be perfect. You'll see.
You want to peel the corn carefully, because we will be using the husks to wrap the corn in later on...

You want to steam the husks for several minutes until they are more pliable. Set aside.

 In a cookie pan, I put a cutting board, and with a sharp knife slice the kernels off the cob. Just one slice should do it; if you go too deep, you will get too much starch, and the tamalitos end up being too dry.
 Once you have a blender full, add a little moisture like water or milk, and blend away! The mixture will be somewhat runny, but that's ok. The starch should thicken it up. Pour into a big bowl and put in freezer or refrigerator until you have all corn blended. With one batch you may add some onion if you prefer, but this is optional. I had pre-made some ground chicken, so I added that to the batter. This does not have to be done but if you prefer it to be a whole meal, then adding some meat is a good idea.

I am really bad when it comes to exact measurements. God had given us the ability to taste, and I always rely on that when it comes to making tamalitos. I will include a basic recipe though to make it easier for you.

Add some melted butter (or margarine), salt and just a little bit of sugar to taste. Add chicken powder too, or do without. This is optional as well. Keep tasting to see when you have gotten it to taste 'right' for you.

Here I had forgotten all about taking photos, so let's see if I can just explain it. Once you have all ingredients mixed, take two husks, and put one on top of the other as in the below photo of a done tamalito.

 Add a serving spoon of the batter, and wrap the sides over it, and then fold the tips of husks inward. Place upside down so it won't open. Don't worry if it will drip a little. It should keep enough moisture.

In the pot or canner, have a rack in the bottom where you stack your tamalitos. Pour some water on, and cover with lid. Cook for one hour. Remove and cool, or eat while hot.
You can freeze these and they will remain good for several weeks. Heat up the same way you cook them, but just till they are heated through.

If anything is not clear but you want to try making these, feel very free to ask more questions.  

 Basic Recipe

one blender full of field corn
2 teaspoons salt
2 teaspoons chicken powder (consomme)
1 tablespoon sugar
1/2 stick butter or margarine
1/4 onion
1/2 - 1 cup of milk or water, (depending on how ripe the corn is)

You might prefer it saltier, so be sure to test taste it to see when the flavor suits you. Or you might prefer more sugar, or no sugar at all. Or more consomme and less salt. I think you get the idea! Go with what works for you.


Friday, June 10, 2011

Fried Okra

Okra never used to sound appealing to me, but then I was at Cracker Barrel and had some, and ever since I have loved it! Here is the way I make it. It comes so close to Cracker Barrel's that you might not even notice the difference...

1/2 lb. okra
1 cup cornmeal
1 Tbsp. salt
1 cup cultured buttermilk

flour
vegetable oil

Choose okra that is an even green color and not too long. Trim stem ends from okra and cut into 3/4" lengths. Toss okra in flour to cover lightly. Soak in buttermilk for 15 minutes. Mix cornmeal, salt, and pepper in a plastic bag. Add okra and toss to coat.
Heat 1/2-inch of oil in a 10" skillet (cast iron is traditional) over medium high heat.When oil begins to simmer, add okra to skillet. Cook, turning occasionally, until golden brown. (Stir gently to avoid losing coating.) Drain on paper towels and salt again if needed. Enjoy!


Linking to this party: This Chick Cooks

Sunday, March 6, 2011

Singing the praises of buttermilk...

When Daniel went to the US last week, I ordered buttermilk powder. Yes, you heard me right. Why?

When I first came back to Belize, I went hunting for buttermilk. In store after store I was met with blank looks when I asked for buttermilk. I eventually stopped looking. Sorry to say, Belizeans just don't know what they're missing, and how good food made with buttermilk tastes. I mean the cultured kind, not the kind that's left over from making butter. Anyway, I had to wait all this time for someone to go to the US so I could order some buttermilk powder, and now I finally got it!

Now that I have the powder, I believe I can get a starter, and keep making it myself. (Perhaps there is a business opportunity here for me as well...I am dreaming about it; if I can convince people that food tastes better made with buttermilk) 

I am convinced I don't have time to make every one of these recipes just to take photos of to show you, but here are some great recipes for buttermilk foods.

Ever heard of scrumptious buttermilk pancakes? If you have been to Cracker Barrel, you probably have...

How about a decadent chocolate cake


How about fluffy buttermilk biscuits! A real southern treat for breakfast, and when I miss Tennessee, I sometimes make biscuits and sausage gravy, a must try if you haven't yet...

Hushpuppies. I guess most people have no idea what that is, but they do taste great! Not a regular treat, but now and then I make some.

Fried Okra. Ahhh, now that is a treat, and they go fast at our house. It might not sound appealing, but you simply have to try them to believe they taste good. They absolutely do.

Buttermilk Cornbread. The best cornbread there is.

There you have some new recipes to try! One thing I learned while living in TN is that a good cook is not without buttermilk. During this time when I have not had it on hand, I have used yogurt and kefir as substitutes, and they work all right, but it's not QUITE the same.  

I am so glad to have my buttermilk back.


Monday, August 31, 2009

Bread, -yum!


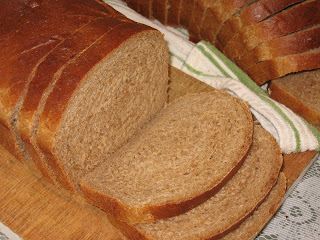
I had heard of sprouted wheat bread but never knew it was pretty easy to make some seriously delicious and fully healthy bread with soaked wheat flour which does pretty much the same thing as sprouting the grains (correct me if I'm wrong). I took this photo after I tried this recipe for the first time, and I will let the picture say the rest. Healthy eating is fun!

Tuesday, August 25, 2009

Let's make some Ice Cream!

Ice Cream. While it is still summer. That is scary. As if summer is almost over, and I don't want it to be!


Get your gear out, and let's get cranking! I always feel so much better about eating ice cream that I have literally worked for, and once I have cranked that handle for 20 minutes, I have lost enough calories to deserve some, believe you me. (This is a genuine old fashioned ice cream maker that I convinced my husband to buy me for a gift after seeing it in an antique store... ;) )

How does that look?

I thought so...

I threw some strawberries in the blender with some soft ice cream and made a quick flavored variety. Hmmm, I think I could use some just now. After all, its still summer...

Ice cream

1 1/2 qt. whole milk
1/2 qt. whipping cream
2 egg yolks
1 cup sugar
2 T gelatin
1 T vanilla
1/2 tsp. salt

Soak the gelatin in a little cold milk.

Scald the milk with the sugar and egg yolks, stirring to prevent burning.

Pour hot mixture over gelatin mixture; add salt, stir and cool.

Whip the cream and once the milk mixture has cooled completely, add it to the whipped cream with an egg beater. Add vanilla, and freeze. If you don’t have an ice cream maker, try to stir as often as possible once it has started to freeze. 


Monday, June 29, 2009

How about a summer refreshment?

Take some fresh, organic, unpasteurized, non-homogenized cows or goats milk. That's lots of digestible calcium right there!

And some frozen bananas. Potassium, vitamin A, fiber, protein, and lots more nutritious goodness!
Spinach, fresh from your garden or frozen from your freezer. Either way, you will get all that iron, calcium, vitamin A and too many more vitamins and minerals to mention here.

How about some essential peppermint oil? The real thing! Not only does it taste wonderful, but it is very good for your stomach- and some! Now blend all that goodness together. What do you get?

Something beautiful. Something delicious. Something healthful. Something very, very refreshing on a hot summer day.

Something so good the children don't even notice mommy taking their picture as they are sipping away. Here is the recipe:

Green Mint Slushie (or frostie) (or smoothie) (OK, help me give this drink a name!)

2 frozen bananas
2 handfuls spinach
2 drops peppermint oil (no more!)
3-4 cups milk

Blend till smooth and green with no sign of the spinach, except the color. Enjoy, enjoy, enjoy!

My children would want to drink this every day. And you can't even taste the spinach. How good is that?!
Related Posts Plugin for WordPress, Blogger...