Showing posts with label Projects. Show all posts

Friday, May 10, 2013

Vintage Sewing Machine Table

When it comes to old treadle sewing machines, I seem have a magnet in me that draws me to them.  One day I spotted this rusty frame (below) sitting in the rain and sun on someone's yard. I couldn't help but ask about it. For a small fee they let me have it. It is a FARMER sewing machine frame, something I don't recall seeing before.
  I cleaned, scrubbed and sanded the frame quite a bit. I was debating what color to paint it. The original was brown, so since I was in a restoring mood, I went with it.

 An old piece of plywood found in the old shed works well for the tabletop. I took a rosewood colored polyurethane (that was lying around from before) for the finish, and there I have it. A simple yet sturdy little table that could be turned into a sewing machine table again, or just to be used as a coffee table. In this case I have my vintage bowl and pitcher sitting on it.

Plus, it makes a nice place for little feet to play . The kids have fun pushing the pedal up and down. This is one 'sewing machine' they are allowed to do that on as much as they want to!

See you again soon! I've got more fun coming up!


Sunday, May 5, 2013

Glass bottle cutting projects

Lately I have been into crafting quite a bit. Seems like I have my times where I enjoy doing a certain thing and then I do a lot of it... Here are some projects I have done after baby this past year, but most of them are from the past months. I plan to do a series of posts on DIY projects I have done lately, so be sure to check back.

 This is my new hobby, to make things out of cut glass bottles. This is a juice bottle I have cut and glued back together this way. I can't wait to do more of this kind of fun. The possibilities are endless! No more nice bottles going to waste here, except the ones that break when I try to cut them.

 A close-up of the glued part.
 
 Cut bottles that we glued neat pictures on, then spray-painted with a clear coat to keep them looking good. These make lovely gifts. (we gave some to the children's school-teacher.) These could be made into drinking jars, but require a lot more sanding than I have time for.

 
 And one of my favorites. A wine bottle lantern. I placed a baby food jar inside this one with a candle in it.

 Come back soon to see what else is new!


Friday, August 19, 2011

My Western Wallhanging


Howdy!

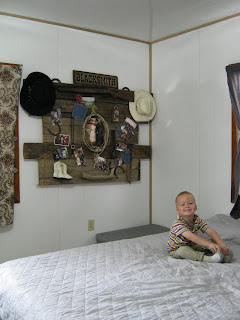
For a long time I have dreamed of having a house with one bare wood wall that I was going to decorate with our western and cowboy memorabilia. Well, who knows how long I would have to keep dreaming so I decided this is what I'll do. Make a wallhanging which can be moved wherever we move... I had started collecting different items from here and there while cleaning house lately, and when FJI said her next theme would be western/farm, that was all the push I needed to finally start my project. I got busy last week, and here is the result.
 I started with raiding hubby's parents' farm for old wood. I found enough old stuff to make the perfect background. When I fell in love with Daniel, he was a cowboy on that farm. That is my first impression of him, so in my eyes, he is still my cowboy, even though he is more engineer now than cowboy. We used to do a lot of riding and cowboying way before any children came into the big picture. It felt good to put together all the cowboy items from years past, and Daniel was quite pleased and surprised when I revealed the finished project to him. I kept it somewhat secretive from him. When he saw it, he understood what all that old wood was for! And now he likes old wood too... :)

 When I started out, I did not have the whole picture in my mind, but I realized as I was arranging the pieces on the boards, I soon got an idea for what 'goes'. 
I wasn't sure which photo to put in the middle, so I tried with two different ones... We did not have a western wedding; only took western style photos before the wedding. I am always glad we did. Those are our wedding hats.

 I just had to throw in this little piece with the cute saying.
 Photos of our children.

The horseshoes used are ones that used to be on Rose, our special horse in the US. (Oh and I realized I made that horse story part 1 and have yet to post part 2!)
 These cutest little cowgirl boots where my daughter's when she was 2. So cute, I can't part with them!

 ...more wedding memories....

 cousins
 This piece of wood is a dried cactus that comes all the way from Arizona. I thought it fit in so well, especially since we both love the American West.
 
 A hilarious card Daniel's brother gave us when we were married a little while... ;) Timothy thought it was him...

 Photos of Daniel's bygone cowboy bachelor days...the pockets come from his used wranglers. He has worn through many a pair.

 His old belt buckle...

The gun is just an air rifle.
The wallhanging hangs in our bedroom. Here in Belize the houses usually have lots of window space, so it is hard to fit anything big into the bare wall space.

So long, cowgirls!
Linking to parties:
Funky Junk Interiors
The Shabby Nest
Sunday, August 14, 2011

Uses for my spools!

Last week I posted that I had gotten two wooden cable spools. Well, in just over one week I had found so many uses for them, that I went back to the light plant and got myself two more! Who would have known that they could come in so handy. For now I have decided to leave the wood color natural. If I get tired of that, I can always paint them later. This way they blend in with nature well. (Thank you Simply Scaife!)
 My favorite one is to brew a cup of coffee, and early in the misty morning go out to sit under the tree and refresh myself in God's Word and have fellowship with Him. Nothing feels more refreshing!
When the nephews come around, they ask if they are allowed to play on the spools. Why yes! They are so sturdy, they make an excellent toy. You can even stack them into a tower that looks great.
When play is done, just roll them back again. They are very easy to move. Just tip on the side, roll to where you want it, and tip upright again. No heavy lifting is needed. The big one is a table, the smallest ones are stools, and the medium one is an indoor shelf. If you have any kinks in your back, roll it over one of these spools and you will feel great! 

A tea party! I will follow up soon with details on this one, so stay tuned...

Linking to this party:

THE SHABBY NEST


Sunday, August 7, 2011

Barbed Wire Roll Egg Basket

 When Daniel built some fence a while back, he came home and I found this 'bucket' frame among his tools and other fence things. It used to hold a big roll of barbed wire, and the handle had a red plastic on it to make it easy to handle. My first thought: I have got to turn that into a bucket! I found some leftover chicken wire from our coupe, and in a short time fashioned a little egg basket out of it. Now I love it! I wonder if I should paint it white? :)
 Linked to:
Funky Junk Interiors

Monday, August 1, 2011

My 'new' spools and what to do with them...

Daniel works parttime at the Light Plant, so the other day we went there, and I saw some of these big spools stacked. I told him, "I want those!" My husband, who knows better than to argue when I say something like that, went and inquired about them, and got me two for $5 each. Not bad, right? I see a rugged handy table to have sitting on the porch with the small spool as a stool. I hope to aquire one more of the smaller spools.

Now, for the big question. How should I fix them up? Paint them? The tops are in bad shape, so I am wondering if I can cover them with some fabric and then clear vinyl, like this person has done it. I quite like the idea...or do you dear readers have any idea what I should do with them?

Please don't be shy to give your opinions and ideas!

Linked to Shabby Nest

Thursday, April 21, 2011

My next fun Project

 A beautiful hutch I plan to restore. Maybe its not real perty yet, but I can already see how it will look, and to me that is beautiful. Remember I told you I had gotten something special when we went to MET? Let me tell you how I came across it. 

When I walked about the grounds at the resort, peeking into the old sheds on the property, I saw this piece of furniture standing in one corner, somewhat exposed to the the rain at times, and not having a proper place to sit on. I felt kinda sorry for it... I went back to Daniel and told him, I am going to ask to buy it. I think I just about embarrassed him, and he said they probably won't sell it. I asked anyway, and they said it was mine for 50 Bze. After only a little bit of thinking,... "Yes, I'm taking it"!

OK, I agree it looks a little sad yet. It came with one drawer and the doors missing, the bottom shelf gone, the boards in bottom starting to rot, one door knob gone AND the back torn away... Perhaps you're thinking, what could I possibly have seen in this piece of junk that compelled me to pay 50 for it! I'll tell you what: A sturdy frame like you don't often see built anymore that can last another couple hundred years if taken care of. I saw a lovely white hutch with my vintage enamelware displayed behind the glass doors, which are all intact. When I said recently that all I needed to display the dishes was a cabinet painted white, I had NO idea I would come across the perfect thing so soon.

I saw in this hutch what I saw in these old pieces which I have already restored...

before...

 ...after

I will be sure to let you all know how this next project works out, but first I have other priorities I need to tend to. So, in a while!


Thursday, March 24, 2011

Catching Up

Finally I have gotten the quilt done. I don't think I will attempt another queen size quilt anytime soon. I thoroughly enjoyed having all the ladies over to help me quilt it though.

 I have matching curtains, and plan to make matching pillowcases someday. For now I will pack it away.

 Here are the chickens I mentioned a while back. For the most part the coupe is now done. All the wood is recycled. I love recycling! The posts come from hubby's work shop, and instead of nailing a structure that can be moved, I dug holes in the ground, put the posts in and attached everything to the posts. I did not bother trying to saw those posts in any way, so I found it easier to put them in the ground till they were the same height, as the posts came in different heights. Our skill saw is down so everything else had to be sawn by handsaw. (I suppose its just as well, since I am too busy lately to exercise, but I need it somehow. :) The roof is not nailed down and can easily be removed. The door is on the north side; I used a plywood sheet as I figured this way the chickens had a little more shelter in one corner at night. During the day we open the door and let the chickens roam. It is Joseph's job to feed them before breakfast, and he enjoys it. 

Will it save us any money raising a few chickens this way? Maybe, maybe not, but when you are a parent, you start looking at things not just from a financial point of view, but how will your children benefit from the experience. And in this case I realized it is an invaluable lesson for them. Besides, its fun!!!

Tuesday, March 1, 2011

Fun Project

A wobbly old table. My Dad built it years ago for my sister and myself. Two rickety old chairs that my aunt said I could have.


I am having lots of fun working on this set, and will show you how they look when they are all done. Both my dad and my mom were (are) good carpenters. My Mom would probably not prefer to be called by that title, but she is good at it!

Stabilizing the chairs so they won't wobble anymore.


(And now you know why I can't finish my quilt; this table and chairs are standing right next to it...)
Related Posts Plugin for WordPress, Blogger...